Overview
Flare is a fast, easy and beautiful darkroom for your Mac.
The original Flare was named Best of the Mac App Store in 2011. Now Flare 2 is here and features an improved workflow, a new user interface for Yosemite, curated collections of Effects that are updated monthly, and iCloud support so you can take your favorite effects with you wherever you go!
When you download Flare Effects, available for FREE on iOS 8, your custom built desktop effects from Flare 2 will sync automatically onto your mobile devices instantly.
Choose from a variety of Flare's built-in effects or create your own using dozens of individual photo filters in near infinite combinations. Easy to learn for casual hobbyists, Flare 2 also has the flexibility professional photographers need.
Getting Started
The first time you run Flare, you'll see a button to Try a sample image with a guided tour. When you click this button, you'll be presented with a series of popup windows that guide you through the features of the app. If you haven't run this guided tour yet, take a moment now to try it out. When you're done with the guided tour, you'll feel right at home while learning more about Flare in the sections below.
If you have an iPhone, iPad or iPod touch, you'll also want to download Flare Effects. It's a free download from the App Store. With this app, you can use all of the effects from your Mac while editing photos in the Photos or Camera apps on iOS.
What's New?
Have you used Flare before? Here's some new stuff to check out!
To start off with, Flare 2 was rebuilt from scratch to look and work great with Apple's newest version of OS X: Yosemite. From simple details like buttons to complex animations that guide you through the app, every element of the app has been carefully crafted to highlight your Mac's capabilities to process photos.
Another important aspect of this new version is the improved workflow. It's easier than ever to browse your effects or create a new one. A new "batch mode" also makes it a snap to apply an effect to a group of photos. An Export window also makes it possible to save all your images without interruption.
Many new filters were added, including the ever popular Tilt-Shift! You also have many more textures and borders to choose from when creating your own effects.
With the new iCloud support, Flare can seamlessly sync all your effects between devices. If you use Flare on more than one Mac, the effects will appear automatically as soon as you sign into iCloud.
These new syncing capabilities, along with support for iOS 8 Photos Extensions, gives Flare superpowers on the camera you carry every day. Just tap on Edit from your Photos or Camera app and let Flare work its magic while you're on-the-go. It's perfect for giving your snapshots some personality before being posted to your favorite social network!
How To Use Flare
Using Flare is easy!
- Drop the photo you want to edit on the Flare window or Dock icon.
- Crop or rotate image as desired.
- Apply an Effect using the previews to find the look you want.
- Save the photo to your Mac or share it online.
Flare has more tricks up its sleeve, but if you don't need them, they'll stay out of your way. Keep reading if you want to know more about what this app can do!
The Main Window
Welcome to Flare's control center!
After you open an image in Flare, you'll see the following screen:
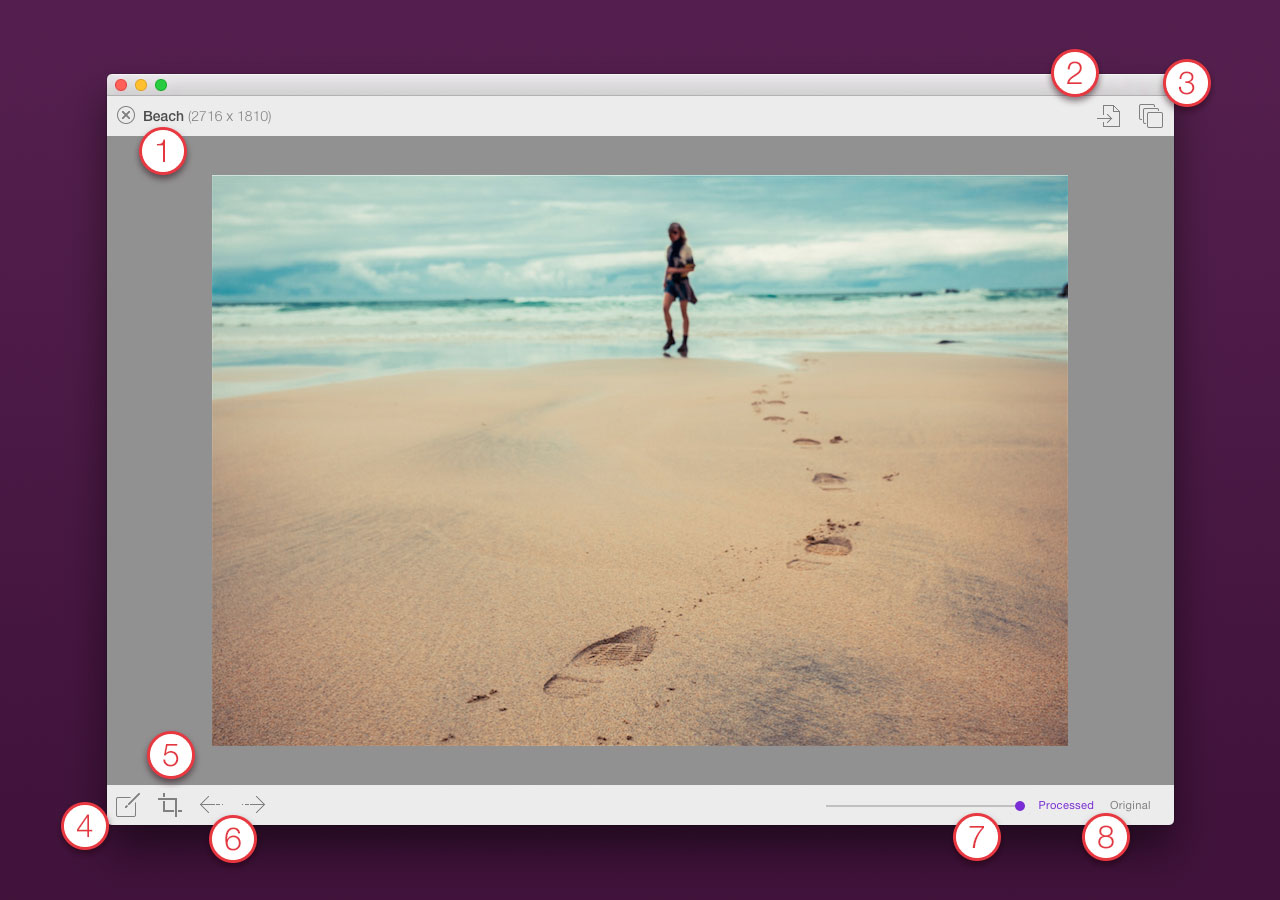
- File name and size
- Save a new photo on your Mac
- Open the Effects panel
- Open the Effect editor (both Simple and Advanced)
- Crop the current photo
- Undo and Redo
- Master opacity for Effect
- Compare processed photo with original
Working with multiple images
If you drop more than one image on the Flare icon in your Dock, all files will be displayed in the main window with an image picker displayed below them. When you select a new effect, it will be applied to all the images. You can also add new images to the batch by click on the + icon to the right. When you save your edits, new versions of all the images will be saved using the selected effect.
Picking An Effect
Hundreds of ways to make your photo look even better…

This panel is where all your photo effects are kept:
- Section selector (explained below)
- Display control for thumbnail, detailed, or compact lists
- Sorting options for name, modification date, or favorites
Each section in the panel is specialized for certain kinds of effects:
-
My Effects This is the place to keep all your favorite effects. Any effects stored here get synced to your other devices, including other Macs and mobile devices.
-
Best Of These effects are curated by the developers of Flare and are seen by all users of the app. Some of these effects are created by us, some are submitted by users like yourself. In all cases, they represent the best of what Flare can do with your photos!
-
Snapshots Often, while you're working on a new effect, it's not quite ready for your My Effects collection, but you still want a place to save it. The Snapshots section is designed to handle this situation: think of it as a temporary scratchpad for your work. The effects saved here are not synced to other devices.
To select an effect, just click on the item shown in the list and it will be applied immediately to the photo you see to the left. When you select an effect you also get a gear icon that can be used to manage you effects:
- Delete The effect will be removed.
- Copy to My Effects Adds the effect to your My Effects collection
- Save As… The effect will be saved as a file that you can share with friends
Clicking on the effect's name also lets you rename your effect. To make the effect a favorite, just click on the star icon.
Effect Editing
… and thousands of ways to adjust your effects!
Every effect consists of a series of photographic filters that modify your image. Flare makes is easy to adjust the settings, order and kinds of filters that applied. When you click on the Edit Effect button in the lower-left corner of the main window, two things can happen:
Simple effect editing
Some effects can be modified quickly and easily using simple controls in a popup window. Checkboxes, sliders and color pickers let you change the look without fretting about the details. Here's an example of what the simple editing interface looks like:
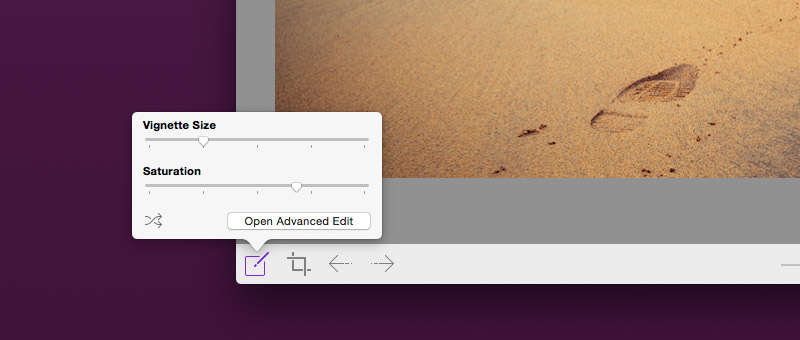
If you feel like you need more control over the image, you can always click on the button in the lower-right of that popup and open the advanced editing panel.
Advanced effect editing
The advanced editing panel shows everything that makes up the effect. Like Photoshop and other image editors, the filter at the bottom of the list is the first one applied to the image:
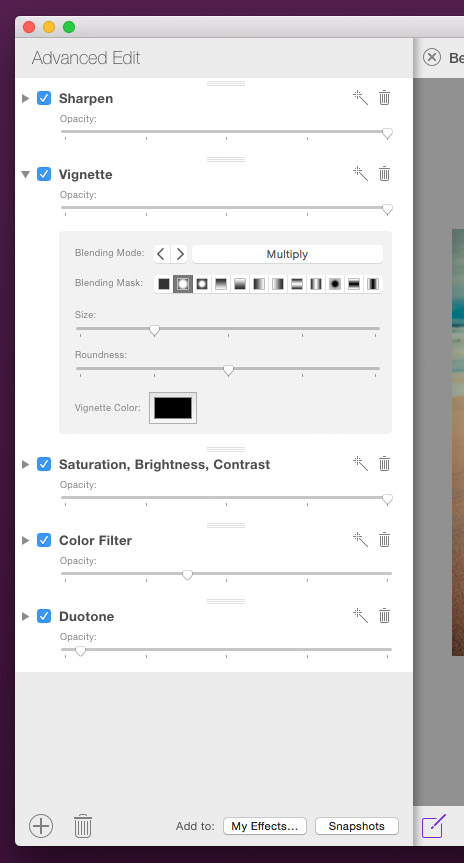
There are some controls that are common to all filters:
-
Opacity Opacity is the simplest of the common settings. It just means how strongly the filter is applied to the photo. Low opacity means your filter will be weakly applied, while high opacity means that your filter will be more strongly applied (and depending on the filter, may cover up parts of the original photo).
-
Blending Mode Flare filters offer eight blending modes: normal, multiply, screen, overlay, darken, lighten, hard light, and color dodge. Depending on which blending mode you choose for a filter, it will be combined with your photo in different ways. To really get the hang of blending modes, we recommend spending some time playing with them. If you’re curious about the theory, though, Wikipedia has a useful explanation.
-
Blending Mask The blending mask for a filter shows you where and how strongly that effect will be applied on your photo. If you choose full, it will be applied at full opacity across your photo. If you choose vignette, it will be applied more strongly toward the edges and more weakly toward the center; if you choose linear left, it will be applied most strongly at the left edge and least strongly at the right edge. This is another place where a little exploration goes a long way.
Below these common controls are ones that are specific to each filter. Some filters have no additional parameters. If you'd like to know more about the filters themselves, there's a list of all filters included with Flare.
Rearranging filters
Each filter has a grab bar at the top of its box. Clicking and dragging on these grab bars lets you reorder your filters. Filters are cumulative, so depending on what filters you’ve decided to use, the order in which they’re applied may make a big difference. For example, if you apply an exposure filter over other effects, that exposure changes will be applied to all the other filters as well as the original photo. If you move the exposure filter to the bottom of the stack, it will only be applied to the original photo.
Using opacity and master opacity
There are two ways to change the opacity of your effects. The first is the Opacity slider on each individual filter. This slider works exactly as you expect—it changes the opacity of that particular filter without changing any other filters.
The Master Opacity slider in the bottom-right corner of the main window lets you change the overall opacity of the effects applied to the photo. In other words, it doesn’t touch the opacity of each individual filter; instead, it makes the whole combination of filters more or less opaque.
This is a little hard to get across in words; the best way to see what we mean is to try it!
Shuffle: Add some variation to an effect
If you like the basic look of an effect, but want to introduce some variation to the look of it, you can use the Shuffle item in the Effects menu. You can also just press the S key.
Each time you shuffle, one or more of the settings for that effect will be changed slightly. Remember that you can always use Undo if you don't like what you see!
Cropping & Rotation
Flare doesn’t just handle tricky stuff like filters and effects; it also covers basic image editing features like cropping and rotation.
Cropping
Click the Crop button near the bottom-left corner of the main window. You’ll see a crop view for the original photo—any effects you’ve applied won’t be visible.
Once you choose an aspect ratio and orientation for the crop selection (or decide not to use them), you can resize your selection by dragging the dots at the corners and move it by clicking and dragging anywhere within it.
Flare offers center (crosshair), crossed (x), rule of thirds, and golden ratio guides to help make sure the composition of your photo is as perfect as it can get. When you resize or move the crop selection, the guides move along with it.
Once you’re content with your crop selection, click Apply and your cropped photo will reappear with effects reapplied.
Rotation
Flare automatically handles rotation based on the EXIF data present in the original file. If you find the need to do additional rotation, you can use the Rotate Clockwise and Rotate Counterclockwise items in the Edit menu.
Saving Photos
Your images are looking great, so let's keep them around!
Saving your processed images from Flare is easy: just click on the save icon in the top-right corner of the main window. You can also use the familiar ⌘S keyboard shortcut.
If you're currently editing a single photo, you'll get a save dialog where you can choose the format and size of the saved file. For JPEG files, you can also select the output quality. When you hit Save Image the Export window will appear while your photo is processed for output.
When you're editing multiple photos, you'll be prompted to enter a folder where the images will be saved. After selecting the folder, all the images will will be processed in sequence from the Export window.
Sharing your Photos
Show the world your beautiful photos!
In addition to saving your photo, you may want to post a copy on favorite social network (Twitter, Facebook, Flickr and many others are supported.) You can also send the image to other apps like Mail, iPhoto, and Aperture. There's even an option to use the current image for your desktop background!
To begin sharing, just select Share Image from the File menu and select the service you want to use. The image will begin processing in the Export window and be presented in the standard Share sheet. From that point, you can add an additional message or tags.
If you don't see your favorite service listed, make sure it's enabled in System Preferences. Check the Share Menu options in the Extensions panel. Items that are checked will appear the next time you start Flare.
You can also use Flare's preferences to set the image size and quality. Note that some services, like Twitter, use an image size and quality that you can't change.