Flare Help
Filters are the basic building blocks of Flare. If you want to make any changes to your photo other than rotating or cropping it, filters are the way to do it. The filters included in Flare are broken up into these groups:
Exposure
Exposure
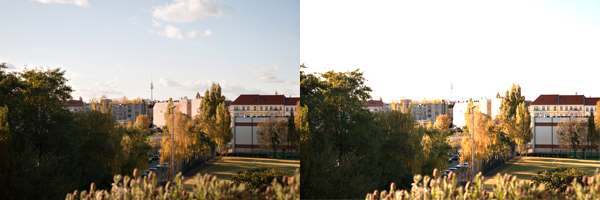
Exposure lightens or darkens your whole photo.
Using Exposure will create the effect of over- or underexposing your photo, and therefore is best for strong lightening or darkening. Overexposing your photo will brighten it until the lightest area of your photo is all white; underexposing it will darken it until the darkest area is all black. Be aware that using exposure will cause you to lose detail in the brightest or darkest areas. To avoid this, try using Midtone Brightness instead.
Brightness & Contrast new
Brightness & Contrast will adjust exactly these characteristics of your photo.
When the exposure of your photo is not perfectly balanced, increasing the contrast will emphasize the light or dark areas. Use Brightness to adjust for extremes when changing the Contrast.
Midtone Brightness
Midtone brightness lightens or darkens the middle tones of your photo while having relatively little effect on the brightest and darkest tones.
Adjusting the midtone brightness effectively changes the slope of the transition between dark and light areas, without modifying these extremes. If the exposure of your photo is right, this is the best filter for lightening or darkening the image, since it will not lose any image fidelity when used moderately.
Highlights & Shadows new
Highlights & Shadows will help to recover the light and dark areas of your photo.
Turn these values up to the maximum and add one of the Sharpen filters to simulate the look of a HDR effect.
Color
Saturation & Vibrance new
Increasing Saturation makes the colors in your photo more intense, and decreasing it makes them closer to greyscale. Vibrance does the same thing, but will be less agressive on skin tones.
Color Tint
Tint overlays a color on the photo; it’s like adding color in the print process of a physical photo.
Depending on the Blending Mode you use with tint, you will get very different effects; we recommend checking out Multiply, Screen, and Overlay. Using the opacity with Tint is also very important. Tint is particularly helpful for certain vintage effects; for more photographic effects, use Color Filter.
Color Filter
Color Filter works similarly to using a physical color filter on your camera—that is, putting a colored piece of glass in front of the lens.
Any saturated color works great with the Color Filter, however there are two classic usages: Use yellow to orange to make your photo warmer, or use cyan to blue to make it colder.
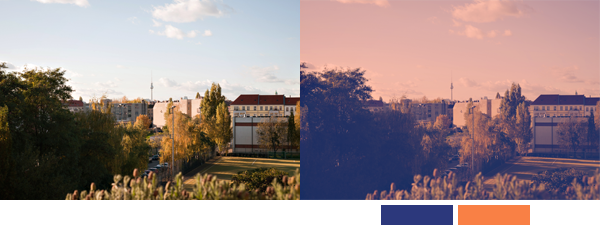
Gradient
Gradient overlays the photo with a color gradient instead of a color, but otherwise works like Tint.
The basis of the Color Gradient filter is—you guessed it—a color gradient, but using the blending modes gives very different effects. Opacity is also very important with this filter.
A classic usage of the Color Gradient filter is a vertical gradient from blue on top to orange on bottom to give a landscape photo with a horizon a more blue sky and a warmer landscape.
Duotone
Duotone is like black and white, except that you choose the two tones used.
The photo’s black areas are replaced by the Dark Color and the white areas are replaced by the Light Color. Tones in between the extremes are gradually mixed between these two colors.
Duotone can be used conservatively—for example, making the dark color a dark brown and the light color a light yellow to create the impression of a faded black & white photo—or more adventurously—say, by making the Dark Color white and the Light Color black to create a negative image. Duotone is very powerful, and experimenting with it can create very interesting and unexpected results.
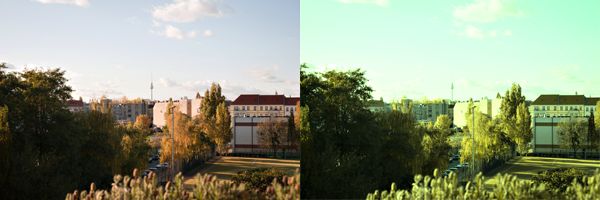
Color Cast new
Color Cast adjusts the tonal curve of your photo for red, green, and blue independently. It is different to a Color Filter or a Tint because it works on the Midtones of each color channel separately.
This is especially useful to simulate the characteristics of old film. Kodachrome film has traditionally been emphasizing reds, while Fujifilm had a strong emphasis on green. Positive film tended to slightly emphasize the blue channel.
Black & White
Black and white uses a special gradation curve to convert to black & white, mimicking the qualities of film. The lightness may be changed with the Midpoint Balance parameter.
Midpoint Balance, which has a similar effect to Midtone Brightness, is especially helpful and should be carefully adjusted for each photo. Use Black & White together with Grain, Vignette, and Border to create the look of classic black & white prints.
Vintage
Use Opacity to control the strength of all the Vintage filters.
Chrome new
Imitates vintage photography film with exaggerated colors. This characteristic had been strongest with very cheap film.
Fade new
Imitates vintage photography film with diminished colors. This usually happened to prints over time, when they were not perfectly exposed to the fixer chemicals.
Instant new
Imitates vintage photography film with distorted colors. Combine this with Transfer to create something that looks similar to the color characteristics of instant film.
Process new
Imitates vintage photography film with emphasized cool colors. This is a better alternative to the Cross-Processing filter, which mimics the effect of color film developed with the wrong kind of chemicals.
Transfer new
Imitate vintage photography film with emphasized warm colors. Combine this with Instant to create something that looks similar to the color characteristics of instant film.
Mono new
Imitates black-and-white photography film with lower contrast. Its effect is between the Black & White filter and the Noir filter.
Noir new
Imitate black-and-white photography film with very strong contrast.
Add a neutral Black & White filter just before the Noir filter and use the Opacity to control the strength of the effect. This keeps the photo black and white, while giving you the ability to still fine-tune the strength of the Noir filter.
Film
Crossprocessing
Crossprocessing mimics the effect of color film developed with the wrong kind of chemicals.
Crossprocessing has become very popular, especially with film shot in plastic toy cameras. As a result, it looks most authentic when used in combination with corner blur, vignette, and a soft glow.
Profile Presets new
This filter offers 3 distinctive, strong color profiles: Selective Warmness, Feelin' the Blues, and Hipsteresque. These profiles have no real counterpart in vintage film, but are popular effects on mobile phones.
Colorfilm new
The Colorfilm filter will emulate the saturation characteristics of classic saturated color film. This filter is great to give a photo a subtle analog feeling, contrary to the normal Saturation filter.
Be careful with JPG images, as due to the nature of this filter it will emphasize compression artefacts. If you see artefacts, use an uncompressed or RAW version of the photo.
Lightleak

Lightleak is the effect that light leaks in your camera body have on physical film. Use the Texture button to choose from various lightleak textures.
This effect has become very popular with plastic toy cameras. The only realistic Blending Mode is Screen blending. When used with other filters, keep in mind that it should be applied at the end of the filter chain. For example, when used in combination with Vignette, the Vignetting effect of the lens is always trumped by the light leak that comes from a not perfectly sealed camera body.
Texture

Texture allows you to apply structures and surfaces to your photo. Use the Texture button to select from various textures, adjust Saturation and Contrast with the sliders, or invert and flip the textures with the checkboxes.
Textures are great for adding mood to a photo. With this filter it is especially important to try different blending modes and opacity. Also, adjusting the Contrast is very important for getting the right results with some blending modes and textures.
Grain
Grain adds film-like grain to your photo. Use Grain Size to control the fineness of the grain.
While Grain actually decreases the quality of the image, it’s a good way to make your image look less digital and more like film. Grain works well with Black & White, Vignette, Sharpen, and Gaussian Blur.
Lens
Vignette
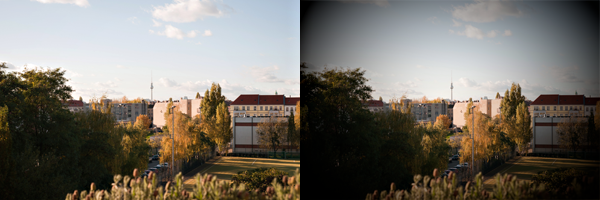
Vignette darkens the corners of your photo. Use size to change the reach of the corners, and roundness to change from oval (fitting the image) to quadratic (exact simulation of lens vignetting) shape.
Change the Blending Mode to “Overlay” if you don’t want to darken light sources like lamps, stars, or the sun in the corners. Strong light sources overwhelm lens vignetting, so this Blending Mode looks more realistic when used with corner light sources. However, in most other cases the Blending Mode “Multiply” will be easier to control.
Glow

Glow adds a glow effect to your photos. Use Radius to increase the size of the glow, and intensity to change the strength.
Glow imitates what happens when your lens gets fogged from moisture, or—in older lenses—from fungus. Lower intensity will add just a bit of a halo, and higher intensity will create effects similar to fog.
Barrel Distortion
Barrel Distortion adds either barrel or pincushion distortion to your photo, depending on the setting of the intensity slider. Use the radius slider to change the curvature of the distortion.
Older or toy camera lenses often show extensive barrel or pincushion distortion. Use this filter to simulate the effect of these lenses. In case of pincushion distortion, use the Scaling filter to get rid of the resulting border area, or pair Barrel Distortion with a border.
Tilt-Shift new
Simulates a depth of field effect that a Tilt-Shift lens would produce. This is often used for simulating a miniature scene.
Soft Focus new
Simulates a depth of field effect that a cheap lens that is unsharp at the edges would produce. This results in an perceptive focus on the middle of the photo.
Combine this with a Sharpen Luminance filter that has a center mask to further strengthen the effect.
Bokeh Rings new
This will put some colored, translucent rings on your photo. Since the rings are randomly placed, and not according to the lighting in your photo, this filter should be used very lightly, to just add a little bit of mood.
Blur
Gaussian Blur
Gaussian Blur blurs your photo. Use the Radius to increase or decrease the intensity of the blur.
Toy cameras often have plastic lenses that are not as sharp as your digital photos. Using Gaussian Blur can help to make your photos look more like film shots with these cameras. Also, bad lenses are not as sharp in the corners as they are in the center of the image. Use the Strong Vignette or Vignette Blending Mask to simulate these characteristics.
Motion Blur
Motion Blur simulates blur along an axis. Use the Radius to increase or decrease the intensity of the blur and Angle to set the direction of the blur.
Motion Blur is one way to simulate camera shake, also known as smear. This can be used creatively with blending modes and blending masks to produce very interesting effects.
Zoom Blur
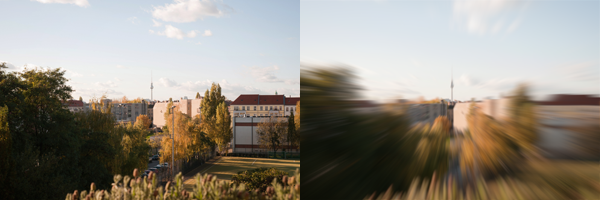
Zoom Blur is very similar a Motion Blur, but from the center of the image outwards.
Experiment with different blending modes and especially blending masks. Constraining this filter to the corners of the image can be very effective in emphasizing the object in the center of the image.
Sharpen
Sharpen makes edges in the image stronger. The larger the radius, the larger sharpen makes those edges; the higher the intensity, the more strongly the edges are brought out.
The Sharpen filter used with higher radius and lower intensity can create the strong local contrast of high ISO film. This is especially effective when simulating black & white film. You’ll also want to add strong Grain when simulating high ISO film.
Sharpen Luminance new
A different Sharpen algorithm, that is strong on the fine details of the photo. This is especially effective with a center mask to set a focus on the middle of the photo.
Borders
Border
Adds one of several distinctive borders to your photo. Use the Border button to choose from various borders.
Depending on the chosen border, this filter can cover up part of the photo in the edge areas. To avoid losing those edge areas, use the Scaling filter to slightly reduce the size of the photo and fit it into the Border.
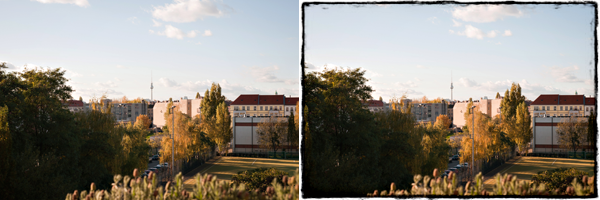
Frame
Adds a frame to your photo. A frame only affects the inside of the border, but leaves the outside shape of your photo completely intact. Use the Frame button to choose from various frames.
The only useful Blending Mode with Frame is Multiply, but changing the opacity is also handy.
Rounded Edges
Rounded edges adds a black frame with inside rounded edges to you photo. Change the corner radius and border size to adapt the frame to your liking.
Depending on the chosen border size, this filter can cover up part of the photo in the edge areas. To avoid losing those edge areas, use the Scaling filter to slightly reduce the size of the photo and fit it into the black frame.
Paper new
This filter adds a paper border, with rounded corners and an inside blur shadow. The best example of this filter is the classic Polaroid border.
Special
Rotation
Rotation rotates your image, according to the setting of the Rotation slider.
This is a filter that can create great experimental results. Try using different opacity and blending masks.
Scaling
Scaling resizes your photo.
Apart from using this in conjunction with Border, Rounded Edges, and Barrel Distortion, this is a filter that can create great experimental results. In this case, try using different opacity and blending masks.
Halftone
Halftone adds the halftone printing effect to your photo. Use the various settings to change the appearance of the filter.
This is a filter that can create great experimental results. Try using different opacity and blending modes, and experiment with the settings.
Pixellate
Pixellate renders your photo with larger pixels, depending on the setting of the Block Size slider.
This filter needs to be fine-tuned to each particular photo. To increase the optical effect of the pixelation try adding the Sharpen filter.
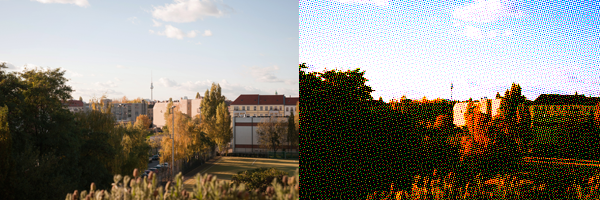
Scanlines
This filter adds scanlines to your photo. The scanlines will vary in thickness according to the tone of what’s below this filter.
Overlaid on an image, this will create the effect of a CCTV screen. Additionally, Scanlines can be used for various special effects and experimental results.
Van Zesen new
This filter will shift the three color planes of the image in different directions and with different rotations, creating the effect of a misaligned print. Adding several Van Zesen effects after each other will increase the shift and rotation.
Timestamp new
The Timestamp filter simulates the time stamp (or date stamp) found in some older film cameras. The visuals of this filter are very close to the original, resulting in a classic, vintage look.
The date and time are read directly from the EXIF data of the photo, so you get the right timestamp automatically.